

Ratchet And Clank Rift Apart Map
This Ratchet & Clank Rift Autonomously Collectibles Guide shows where to find all Collectible Locations in chronological guild. There are 175 Collectibles in total. However, most aren't needed for trophies. The only ones you demand all of are the ix CraiggerBears, 30 Blizon Crystals, 10 Spybots, 5 Glitch Challenges, 60 Zurpstones. The rest are simply partially needed (Gold Bolts, Lorbs, Armor).
Locating all Ratchet & Clank Rift Apart Collectibles unlocks the following trophies:
None of the Collectibles are missable. You can proceed track of near collectibles via the Collectible Card, via PS5's born trophy trackers (for Blizons & CraiggerBears), and via the world map or planet select.
The only Collectibles that aren't marked on the in-game map are the CraiggerBears. Everything else is automatically marked when you lot get close to it. After the 2nd planet (Sargasso) you unlock a spaceship that allows you to fly dorsum to sometime planets at whatever time. Afterwards the story you can resume from the Title Screen to be put back before the final boss. Then you tin can proceed to gratis roam most everywhere.
Y'all can collect everything on the easiest difficulty. Near Collectibles behave over into New Game+ (Claiming Way). Except for the Blizons and Zurpstones, those must all exist plant in a single playthrough.
CraiggerBears are teddy bears, Blizons are crystals exclusively found on the fifth & seventh planet, Gold Bolts are aureate shining bolts that unlock cheats, Spybots are flight robots that unlock the RYNO weapon, Lorbs are Lombax Altars exclusively plant on the 4th planet, Armor gives passive bonuses, Glitch Challenges are puzzles with a spider bot, Zurpstones are exclusively found on the 2nd planet.
Collectible Overview & Individual Guides by Collectible Type:
If y'all're only looking for Collectibles of i blazon, it'south better to use i of the guides linked below.
- 9 CraiggerBears – run across Ratchet & Clank Rift Apart All CraiggerBear Locations
- 30 Blizon Crystals – run into Ratchet & Clank Rift Apart All Blizon Crystal Locations
- 25 Gilded Bolts – see Ratchet & Clank Rift Apart All Gold Commodities Locations
- 10 Spybots – run across Ratchet & Clank Rift Apart All Spybot Locations
- 12 Lorbs – run into Ratchet & Clank Rift Autonomously All Lorb Locations
- 24 Armors – come across Ratchet & Clank Rift Apart All Armor Locations
- 5 Glitch Challenges – run into Ratchet & Clank Rift Apart All Glitch Claiming Locations
- threescore Zurpstones – run across Ratchet & Clank Rift Apart All Zurpstone Locations
A guide by SnowNinjaRaccoon (DK), & PowerPyx
Planet ane: Corson V
Gilt Bolt #1
Afterward you lot meet the Ms. Zurkon weapon vendor in the market area, caput to the right and go upwards the magnetic boot ramp, follow the path to reach the factory archway that has an optional objective marker on information technology. From where you enter the factory, expect straight ahead and go to the associates line at the cease of the room where boxes get upwardly a ramp and disappear behind a laser grid. On this assembly line are some big moving boxes. Jump on the side of one such box when it passes past the terminal "balcony" in the room. Then "wall jump" from the side of the box to the balcony in a higher place it. Y'all only have a brusque time window because the box is moving, merely y'all tin simply wait for the next box if you miss. Information technology'southward easiest when you are standing on the production line backside the box, facing in the direction it'due south moving in. Now that you lot're on the balcony y'all should run across a wall with blue hexagon patterns on it, you can wall-jump upward there. Once at the top, turn effectually to see the bolt (before going into adjacent room). You lot can jump on the production lines at the top of the room and glide around the big boxes that are coming your style until you lot reach the bolt at the end.
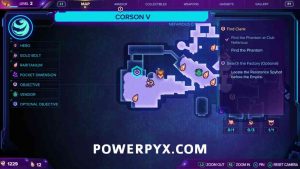

Spybot #1
From the golden bolt go into the next big product hall. Hither you must do a similar play a trick on, this time wall-jumping from the side of metal box on a yellow forklift to land on a big moving box, then from the moving box then onto the xanthous forklift. Then you can bound across the moving product lines at the acme of the room to reach the exit. The rest is quite linear, just impale the enemies upwardly ahead and yous'll be forced to pick up the Spybox at the finish of the Factory. You are forced to selection it up before leaving the Manufacturing plant, then can't miss it at this bespeak.


CraiggerBear #1
In the eastward of the market area. Sitting on the counter of one of the marketplace vendor stalls (the stall has some royal tarp for its roof and a white robot in it). Before going down to club Nefarious.


Armor #1 (Robot Disguise – Helmet)
In the Pocket Dimension in the east of the market surface area. Enter the royal Pocket Dimension (looks like purple portal) and attain the end of information technology to get the armor piece.


Aureate Bolt #2
During objective "Follow the Phantom", yous can grapple to the yellow rifts with  to find this Bolt.


Aureate Commodities #3
Subsequently getting the Omniglove (Story Particular), backtrack to the start of Corson Five in the very north where you came from. At present that you have the Omniglove you tin run beyond a wall console with blue arrows to reach this Bolt.


Glitch Challenge #1
Planet 1: Corson V – Automatic from Story, unmissable.


Planet two: Sargasso
Armor #2 (Galactic Ranger – Helmet)
When playing as Rivet for the first time (female person Lombax) you will come up to a function where the story forces you to enter a large Pocket Dimension (royal portal). Here the game gives y'all a tutorial how to ride Speetles (crabs). From where you hop onto the showtime Speetle the armor will be on an isle direct ahead.


Gilt Commodities #4
In the very north of this planet at the edge of the map you can grapple to a yellow rift on a hill. This brings you to the gilded bolt.


Gold Bolt #five
After "repairing" the bridge (story objective) and fighting a Grunthor (big dinosaur), it'due south backside a green silo in the surface area where yous defeated the Grunthor.


Armor #3 (Robot Disguise – Boots)
Later "repairing" the bridge and fighting a Grunthor, you lot volition have to ride a Speetle over three pressure plates on the floor and then enter a cave (Rivet's Hideout). Earlier going upwards the correct side of the cave, look at the bottom function of the cave where you entered to find a Pocket Dimension that contains this armor.

CraiggerBear #2
A CraiggerBear is found inside Rivet's Hideout, on the couch by the TV. Y'all must backtrack there after defeating the Seekerpede boss at the end of this planet. That's the commencement globe where you lot play as Rivet, the female Lombax.
Armor #4 (Robot Disguise – Chest)
After defeating the Seekerpede at the end of this planet, backtrack to one of the southern Speetle icons on the map. Ride a Speetle to the island in the southwest corner of this planet (bottom left part of map). There you will observe a Pocket Dimension that contains this armor.


Armor #5 (Galactic Ranger – Boots)
This one you cannot get on your kickoff visit to this planet! After finishing the 3rd planet "Scarstu Debris Field" y'all will unlock a new side quest in Sargasso. Utilize your spaceship to return here. The side quest will be marked on the map and it'south called "Help Trudi (Optional)". Complete this quest and y'all volition unlock some Zurpstone icons on the map. Collect 30 total and return them to the quest giver, he volition reward you with this armor. Come across Ratchet & Clank Rift Apart – All Zurpstone Locations.


Golden Bolt #six
Collect 30 total and return them to the quest giver to unlock a flying dragon mount. You tin at present use this to fly over the map. Around the center of the map, southeast of where you unlock the flying dragon mount, there's a gold bolt in the air inside a ring y'all tin fly through. It'south up high in the air, only reachable with the flying dragon mount! See Ratchet & Clank Rift Apart – All Zurpstone Locations.


Spybot #two
Collect all sixty Zurpstones and render to the questgiver to get the Spybot as a reward! Yous should start collect all the easy-to-reach ones on the ground, and so later you have 45 fly on Trudi to shoot the remaining ones with her burn ability (she only learns this motion later on finding 45 Zurpstones, not before that). Also note that the Zurpstones in the northwest (due west of questgiver) might not be marked on the map. So if you cease upwardly with a few missing and zippo is left on the map, wing over the surface area due west of the questgiver (where you went to collect the first few Zurpstones for him) and you should see them easily past their purple glow. See Ratchet & Clank Rift Autonomously – All Zurpstone Locations.


Planet 3: Scarstu Debris Field
Aureate Bolt #7
Close to where you land on this planet there's a golden bolt floating in the air under the central platform. It's a very small planet, in one case y'all keep the central platform you will see the bolt icon on the map (you tin can mark it in that location to meet a waypoint). Reaching this one is a bit catchy. You need to leap off the central platform and and so agree  to glide in the air. You must glide into the gold commodities.


Armor #6 (Q-Force – Helmet)
In the Pocket Dimension in the northeast corner of this planet.


CraiggerBear #3
Later on entering the Pocket Dimension to the Gastropub (purple portal), a CraiggerBear is on a box left of the receptionist. Information technology's on the mandatory story path.


Armor #seven (Robot Pirate – Boots)
Automatically obtained from the showtime Battleplex Challenge. The story forces yous to play this, and so tin't miss information technology.


Gilded Bolt #8
Reward for completing the 4th Battleplex Bronze Challenge "Bugtrax".


Armor #eight – (Carbonox Avant-garde – Boots)
Reward from fifth Battleplex Bronze Challenge "A Grunthor Named Sue".

Gold Commodities #nine
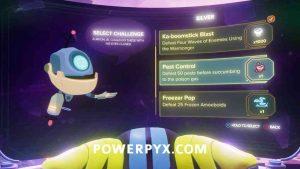
Reward for completing the 3rd Battleplex Silver Challenge "Pest Control". Simply available later beating Planets 4-7. The story will make you return to the Battleplex panel inside the bar at this point and a fight takes place there, subsequently the silver challenges are unlocked.
Armor #9 (Carbonox Advanced – Chest)
Reward from 5th Battleplex Argent Claiming "Revenge of the Seekerpede". The silver challenges become available after finishing the get-go 7 planets, then the story makes y'all return to Zurkie's bar and a fight takes identify. Later on this you have access to the first 4 silver challenges, beat those to unlock the fifth challenge.

Spybot #3
Reward from completing the quaternary Gilded Battleplex Challenge "Vroom Effectually". You lot unlock the Gilded Challenges afterward beating the story on all 9 planets, so basically at the very end of the story. So you tin can return to Zurkie'due south bar to start the Golden Challenges.


Spybot #iv
This one you cannot get on your starting time visit to this planet! It's institute on a far-abroad floating platform in the very northward of this planet. To get at that place yous must first obtain the Hurlshot ability (automated story unlock) from the 6th planet Torren Four. Then you lot can employ the yellowish hook to the right of the purple portal to Zurkie's bar. This will catapult you over to the Spybot platform.


Armor #10 (Carbonox Advanced – Helmet)
Advantage from 5th Battleplex Gold Challenge "Twice as Overnice". The golden challenges become bachelor after finishing the story on all 9 planets, so basically at the very end of the game. Later on finishing the ninth (terminal) planet "Viceron" you tin return to Zurkie's bar to play the aureate challenges. You must crush the kickoff iv gilt challenges to unlock the 5th gilded challenge.

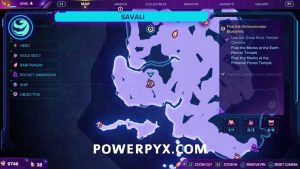
Planet iv: Savali
Lorb #1
Under an energy sphere in the westward of Savali. Follow the wire connected to it and run over the 3 wire plates on the floor with your Hoverboots. This breaks the free energy sphere so that you can take the Lorb from information technology.


Lorb #2
At the edge of the map in the far west of Savali, information technology'due south protected past a bunch of enemies.


Lorb #3
At the northwest border of Savali there's a platform flying effectually in circles at 1 of the temples where you're supposed to save monks (main objective). You must chase subsequently this flying platform. When you lot take hold of up to information technology, printing to grapple onto it. Once you're on the platform step on the pressure plate, information technology will terminate moving and disables the orange energy sphere and then that yous tin take the Lorb.


Lorb #four
You can drive upward a ramp and bound over to a rock with this Lorb on it (must go total-speed with the Hoverboots).


Lorb #5
Found near the center of planet Savali, where Ms. Zurkon is.


Lorb #half dozen
At the northeast edge of Savali, in a cave with lots of sandshark enemies.


Lorb #7
In the southeast of Savali, this Lorb Shrine is guarded past some enemies.


Lorb #8
In the southeast of Savali, on a mount. You need to grapple to the xanthous rift portal on the smaller mountain next to it, then y'all tin can jump on a boisterous mushroom and grapple to the yellowish rift portal in a higher place the mountain with the Lorb.


Lorb #9
In the southeast of Savali, must shoot the 4 pillars at this Lorb Location to brand the Shrine appear.


Lorb #10
At the southeast border of Savali. This Shrine is nether an energy field. To open it, you need to run over the iii greenish floor plates leading to this Lorb Shrine. The first is on the floor in front end of iv wall-run panels, the second and tertiary are during the wall-run.


Lorb #eleven
At the southeast edge of Savali, hidden backside some boxes that you can destroy.


Lorb #12
On the southernmost floating island of Savali. Later you lot cantankerous over the wooden bridge, go right instead of left. At that place you can grapple to some yellow rift portals to achieve the last Lorb Shrine.


CraiggerBear #4
At the very southernmost border of planet Savali. There'southward a floating island in the south of the map. After the offset timed speedskating section, bank check the left side of the little flight island.


Glitch Challenge #2
Planet 4: Savali – Automated from Story, unmissable.


Spybot #5
In the northeast corner of Savali, in a cave with a pirate ship in it. The entrance is southward of the Spybot icon on the map, in the area with waterfalls you must jump over 2 stone platforms to reach the cave entrance (a raritanium is too at the entrance).


Armor #eleven – (Wasteland Gear – Boots)
In the heart of Savali where a Ms. Zurkon weapon vendor is, you lot will encounter a side quest marked on the map. It'southward called "Hunt for Lombax Lore (Optional)". Take this side quest and find 3 Lorb locations. Return the Lorbs to the quest giver to become this armor as a reward. See Lorb Locations Guide.


Armor #12 (Wasteland Gear – Chest)
Reward for bringing 7 Lorbs to the quest giver. Encounter Lorb Locations Guide.

Armor #13 (Wasteland Gear – Helmet)
Reward for bringing all 12 Lorbs to the quest giver. See Lorb Locations Guide.

Armor #14 (Robot Pirate – Chest)
There's a flying platform that's institute effectually the center of the map, east of Ms. Zurkon weapon vendor. Y'all demand to hunt after it and catch up to it, then hold to grapple onto the hook on the platform. In one case you land on the platform stand up on the colored flooring plate to arrive stop, which gives yous the armor.


Armor #15 (Lombax Praetorian – Boots)
Plant inside a pocket dimension in the southeast of Savali.


Armor #sixteen (Captain Starshield – Helmet)
Found within another pocket dimension in the southeast of Savali.


Gold Bolt #10
This Gilt Bolt is on a little mountain in the due west of planet Savali. Notwithstanding, you lot tin can't simply accomplish it from there. Instead, you must quickly drive over 3 greenish floor plates from the northeast to the southeast. There'south a wire connected to these. Subsequently y'all bulldoze over all 3 quickly enough, it volition open up a imperial dimension portal (at the 3rd flooring plate) that teleports y'all to the Aureate Commodities. The first two screenshot below prove the starting point where the wire with the iii floor dots starts, the final ii screenshots bear witness the portal that opens at the end of it and the actual gold bolt location where you lot get teleported to.


Golden Bolt #eleven
Institute in the southeast corner of Savali. There'south a flying platform behind a mountain wall. When yous arroyo, it volition first flying abroad from yous. Chase after information technology and when yous get shut to information technology press to grapple onto it. And so stand up on the pressure plate to brand the platform finish, which lets y'all pick up the Gold Bolt from information technology.


Gilded Commodities #12 & Glitch Challenge #v
This ane y'all cannot become on your first visit to this planet! It'due south only reachable after finishing the 8th planet Ardolis. Later this the story volition take you back to the 4th planet Savali. The environment will change a bit on this story visit, you lot must follow the story objectives until you get clandestine in the northwest of the planet. The story objective you need to watch out for is chosen "Admission the Catacombs". One time you head secret, before holding  to spin a commodities platform, plow around to find a Glitch Challenge. Solve it to unlock the aureate bolt. This would as well be your last Glitch Challenge at this point in the story (because you lot got all previous 4 already by the time you finished the 8th planet Ardolis). You can also still go it later the story by standing from the final checkpoint before the terminal boss and backtracking here, so don't worry it'south non missable.


Planet five: Blizar Prime number
Blizon Crystal #1
Automatic from story.

Blizon Crystal #ii
Automatic from story.

Blizon Crystal #3
Automatic from story.

CraiggerBear #5
Immediately after interacting with the third blizon it'due south in the same room, sitting next to the blizon on some metal parts.


Gold Commodities #13
In the lava expanse take the side path on the left and follow it to the terminate.


Blizon Crystal #four
When you reach the platform in the middle of the map with lots of miners on it and a Ms. Zurkon vendor, cheque the left side for a Blizon Crystal. This 1 as well leads to the next Gilt Bolt.

Gold Commodities #14
After hitting the higher up Blizon Crystal it'due south in that dimension straight in front of you. Apply your magnetic boots on magnetic bridges to achieve the Aureate Bolt.


Armor #17 (Galactic Ranger – Chest)
Constitute inside a pocket dimension in the northeast of Blizar Prime (on the side quest path where you get to search for Chef Tulio).


Blizon Crystal #5
In the side quest area in the northeast leading to Chef Tulio.

Blizon Crystal #6
In the side quest area in the northeast leading to Chef Tulio.

Blizon Crystal #7
In the side quest area in the northeast leading to Chef Tulio.

Gilt Bolt #xv
After hitting the above Blizon Crystal the Gold Commodities volition spawn in forepart of you.


Spybot #6
Reward for completing Chef Tulio's Side Quest "Find the Missing Chef" (marked on the map by side quest icon, in the northeast of this planet). Subsequently finding the Chef you must defend her honey motorcar from enemies, after this she gives you the Spybot.


Blizon Crystal #8
Later on you apply a flying platform to the westward of the central platform where Blizon Crystal #4 was, from the platform where you state caput to the north for ii crystals (as well an Armor in that location).

Blizon Crystal #9
Same area every bit above.

Armor #eighteen – (Q-Force – Boots)
When you striking the in a higher place Blizon information technology will be in front of you lot.


Blizon Crystal #10
Automatic from story.

Blizon Crystal #xi
Automated from story.

Blizon Crystal #12
Automatic from story.

Blizon Crystal #xiii
Automated from story.

Blizon Crystal #fourteen
Automated from story.

Blizon Crystal #15
Automated from story.

Blizon Crystal #sixteen
Automatic from story.

Blizon Crystal #17
Automated from story.

Blizon Crystal #18
Automated from story – during rails grind, at start of track grind.

Blizon Crystal #19
Automatic from story – during rail grind, subsequently doing two wall runs.

Blizon Crystal #20
SEMI-MISSABLE: During the Rails Grind you'll come to a bespeak where in that location are 3 runway next to each other and the path forward is airtight off. Here y'all take a Blizon Crystal on the left rail and another on the right track. To advance forward y'all'd only need to hit 1 of the two to open the path. Make sure you lot get both of these Blizon Crystals here, the one on the left rails and the one on the right track. If you achieve the cease of the rail grind (drill platform) without having gotten these, y'all can still restart the checkpoint to retry. The elevator to the rail will be airtight later, but with some pull a fast one on platforming you can notwithstanding become dorsum in that location (encounter video below).
Notation: On patch v1.001.001 this one didn't count correctly only this was fixed since patch v1.001.002.

This video shows how to get back to #20 & #21 afterwards the story (the lift volition be airtight but y'all can get back to information technology with some trick platforming):
Blizon Crystal #21
SEMI-MISSABLE: During the Rail Grind you'll come to a signal where there are 3 rails next to each other and the path forward is closed off. Here you lot have a Blizon Crystal on the left rail and another on the right rail. To advance forward you'd merely demand to striking one of the two to open up the path. Brand sure you become both of these Blizon Crystals here, the i on the left rails and the one on the right rail. If you reach the finish of the rail grind (drill platform) without having gotten these, yous can still restart the checkpoint to retry. The elevator to the rail will be airtight later on, merely with some trick platforming you can even so get back there (run into video above).

Blizon Crystal #22
Automatic from story – during rail grind, at cease of rails grind.

Blizon Crystal #23
Automatic from story – on the drill platform later rail grind. You are forced to use information technology during the boss fight there.

Planet 6: Torren 4
Golden Commodities #16
At the start of this planet take the path to the right and use your Hoverboots  to bound over the speedramp. This leads to a wallrun section with the gold bolt at the end.


Spybot #seven
Shortly after the start of the planet, after jumping across the gap using the swing rope, go down the magnetic path on your right to notice it (just before Ms. Zurkon weapon vendor).


CraiggerBear #6
Presently later on the outset of the planet, after jumping across the gap using the swing rope, you will see a Ms. Zurkon weapon vendor. But before her on the right side is a market stand with many TVs and this Craiggerbear sitting on the counter.


Gilded Bolt #17
As part of the story you will be forced to do a long runway grind. During this you can grapple to a yellow rift to your left, which makes you collect the gold commodities.


Armor #19 (Lombax Praetorian – Helmet)
After obtaining the Hurlshot ability (story objective), you volition return to the island with Ms. Zurkon weapon vendor on it. From in that location yous must use the Hurlshot to go to the side by side isle on the right (story path). This island has a Pocket Dimension on the right side where some crab enemies spawn, it contains the armor slice.


Planet 7: Cordelion
Blizon Crystal #24
Automatic from story, afterwards first Ms. Zurkon vendor on Cordelion.

CraiggerBear #seven
Later hitting the first Blizon crystal on this planet you will enter a snowy dimension. Later on sliding downward iii times this CraiggerBear is in the snow to your immediate left.


Blizon Crystal #25
Subsequently hit the outset Blizon crystals / after finding the CraiggerBear at that place's a platform to the east with another Blizon Crystal on it. Information technology's quite far abroad. You must jump over at that place with your hoverboots at full speed (concur and printing  to speed up).

Gold Bolt #eighteen
After hitting the above Blizon it's in front end of you.


Gold Bolt #19
After the first lift ride in the level you will enter an underground tunnel. The first room to the left has a golden bolt, yous must grapple to the yellowish rift behind the half-open up door.


Blizon Crystal #26
Automatic from story.

Spybot #8
In the forge, where the main objective is to forge the Dimensionator. Information technology's above the forge archway, pull yourself upwards at that place using the yellow rift.


Blizon Crystal #27
Automated from story.

Armor #20 (Helm Starshield – Chest)
Afterward blowing upward the forge and using the Blizon Crystal, there will exist a pocket dimension in the room you used the crystal in. The pocket dimension contains the Armor.


Glitch Challenge #3
Planet 7: Cordelion – Automatic from Story, unmissable.


Gold Bolt #20
In the underwater section where you stick to the floor using your magnetic boots. When there's a fork in the path, have the correct and use your magnetic boots to jump (  ) up a wall. At the summit is this gilded commodities.


Blizon Crystal #28
Automated from story.

Blizon Crystal #29
Automatic from story.

Blizon Crystal #30
Automatic from story.

Planet viii: Ardolis
Armor #21 (Captain Starshield – Boots)
After defeating waves of enemies in a room where the world volition keep glitching into a regal color, when you leave the room you tin take an optional path to the right and drop downwards to the beach area beneath, there y'all can find the Pocket Dimension entrance. Armor is within the pocket dimension.


Gilded Bolt #21 & Glitch Challenge #four
When you reach the northwest role of the map you will have to go through the "Pirate Trials". After the kickoff room where you accept a karaoke session with pirates, yous will come up to the 2nd room which has a Grunthor skeleton. On the left side is a computer console with a Glitch Challenge, stop this to unlock the gilt commodities.


Armor #22 (Robot Pirate – Helmet)
Reward for completing the mandatory story-related pirate trials, cannot exist missed. Don't worry most this one.


CraiggerBear #viii
In the last room of the pirate trials y'all're awarded the higher up armor piece. In that same room is the CraiggerBear by a pirate chest.


Spybot #9
Afterwards finishing all principal story objectives on this planet you volition be returned to your spaceship. Just in front of your spaceship a new royal teleporter volition take opened upward that brings yous dorsum to Ms. Zurkon in the center of the map. Have the path to the immediate right of Ms. Zurkon and utilize the rope swing to land on a floating pirate transport. On the left side of this pirate transport is an elevator, at the top are two more than rope swings. Subsequently you land, look to your right, the northeastern part of the map. There's a sandy island there and some one-half-broken bridges leading to it. From here you lot must use your hoverboots at total speed to leap onto the cleaved bridges beneath, then you can go onto this island. At the terminate of the island is the Spybot next to a teleporter.


Aureate Commodities #22
Next to the Spybot utilize the Speetle and take the left path on the h2o, the Gold Bolt is hanging over a ramp with explosive around information technology. Employ the Speetle's boost to go total speed over the ramp to jump into the bolt.


Planet nine: Viceron
Golden Bolt #23
Afterward you lot meet Ms. Zurkon follow the path to the right and use phantom nuance through the checkpoints. In the area furthest to the right (due east) is a gold bolt.


Spybot #10
You will destroy a fan to enter a ventilation shaft, the Spybot is inside. Just keep following the corridors and yous'll run across it (just before dropping out of the vents).


CraiggerBear #9
In the aforementioned room where you lot costless clank. Subsequently freeing clank cheque the right side of the room (due east) to find the last CraiggerBear on a bench.


Gold Bolt #24
After rescuing Clank it's found in the next outside expanse, in the top correct corner (northeast).


Armor #23 (Q-Force – Chest)
In the room where Ratchet's and Kit's jail cell ends up. There is an open cell on the left side, second floor, with the armor in it.


Armor #24 (Lombax Praetorian – Chest)
In the pocket dimension to the right of Ms. Zurkon'southward Shop, on your way to the Warden's Role.


Golden Bolt #25
After reaching the warden's office the window volition be cleaved and you lot will have to become through it. Shortly afterwards you will reach a cell block with a anarchism going on. Check the cells to the left of where you lot enter for the terminal bolt!


That's all of the Collectibles in Ratchet & Clank Rift Autonomously.
Source: https://www.powerpyx.com/ratchet-clank-rift-apart-collectibles-guide/
0 Response to "Ratchet And Clank Rift Apart Map"
Post a Comment